Keeping your windows spotless is crucial for enhancing the overall appearance of your home or business. A well-equipped cleaning toolkit can simplify this task and yield impressive results.

In this guide, we will explore the essential components of window cleaning kits, focusing on various types of squeegees and providing expert tips for effective maintenance.
Key Components of a Window Cleaning Toolkit:
1. Squeegees: A squeegee is essential for achieving a streak-free finish on glass surfaces. It’s the primary tool for efficiently removing water and cleaning solutions, ensuring a clear, polished result. The rubber blade glides smoothly across the glass, pushing water away without leaving marks, making it indispensable for both residential and commercial window cleaning.
2. Scrubbers: Scrubbers are key for the initial phase of window cleaning. They effectively apply cleaning solutions and work to loosen and scrub away dirt, grime and other contaminants. Paired with the right cleaning solution, a scrubber prepares the glass surface for the squeegee, making the final pass much easier and more effective.
3. T-bars and Sleeves: These tools are designed for larger windows and glass areas, allowing you to apply cleaning solutions evenly and efficiently. The T-bar holds the sleeve, which soaks up the solution and distributes it across the glass, ensuring thorough coverage. This setup is particularly useful for cleaning expansive glass surfaces like storefronts or large residential windows.

Window Cleaning Kit
with Sill Brush

Water-Fed Brush & Squeegee
with Extension Pole
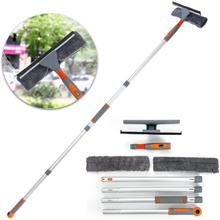
Telescopic Window Squeegee
Pro Kit at Budget Price
4. Scrapers and Blades: When faced with stubborn debris such as paint splatters, stickers or bird droppings, scrapers and blades are the go-to tools. They allow you to safely remove these tough spots without scratching the glass. Using a scraper with a fresh, sharp blade is crucial to avoid damage and ensure the glass is left perfectly clean.
5. Extension Poles: Reaching high or difficult-to-access windows can be challenging, but extension poles offer a safe and effective solution. They eliminate the need for ladders, reducing the risk of falls and making it easier to clean tall windows from the ground. These poles can be paired with squeegees or scrubbers, providing the flexibility to clean at various heights with ease.
6. Holsters and Tool Belts: Organization is crucial in window cleaning, and holsters and tool belts keep your tools within easy reach. By securing your squeegee, scrubber, and scraper on your belt, you work more efficiently, reducing the need to constantly pick up tools and minimizing the risk of dropping them.
Understanding Window Blades: Types and Features
Wipers come in various designs and sizes, each suited for different cleaning tasks. Here’s a breakdown of the most common types:
| Type of Squeegee | Best For | Key Features |
|---|---|---|
| Standard | General window cleaning | Durable rubber blade, ergonomic handle |
| Mini | Tight spaces and small windows | Compact size, easy to maneuver |
| Professional | Commercial use | High-quality materials, interchangeable blades |
| Telescopic | High or hard-to-reach windows | Extendable pole, adjustable angles |
Best Practices for Effective Window Cleaning
1. Preparation: Before you start using a rubber blade, it’s crucial to remove any loose dirt or debris from the window surface. This can be done with a dry cloth or a soft brush. Skipping this step might cause the blade to drag dirt across the glass, leading to scratches or streaks. For instance, a quick wipe down with a microfiber cloth can make a significant difference in the final result.
2. Choose the Right Cleaning Solution: The choice of cleaning solution can greatly affect the performance of your tool. A simple mixture of water and a few drops of dish soap can enhance the blade’s glide, allowing it to move smoothly across the glass and reducing the risk of streaks. Avoid using too much soap, as it can leave a residue that’s difficult to remove.
3. Technique Matters: The way you handle the squeegee is key to achieving a streak-free finish. Start by applying normal pressure to remove the bulk of the water and dirt, then follow up with lighter pressure on the final pass to eliminate any remaining streaks. This technique is especially useful on larger windows where streaks can be more noticeable.
4. Work from Top to Bottom: Always begin at the top of the window and work your way down. This method prevents drips from running over the cleaned areas, saving you from having to re-clean sections. If you’re working on tall windows, using an extension pole can help maintain this top-down approach without straining yourself.
5. Wipe the Blade: After each pass, make sure to clean the blade with a cloth. This prevents dirt and water from being re-deposited on the window, which can cause streaks. A quick wipe with a dry towel or cloth can keep your blade performing at its best.
6. Utilize Both Sides: To get the most out of your rubber wiper, make use of both edges of the rubber blade. This not only extends the life of the blade but also ensures that you’re always working with a clean, sharp edge, which is crucial for achieving a professional-looking finish.
Common Mistakes to Avoid
Here are some pitfalls to steer clear of when cleaning windows:
- Using a dirty wiper blade, which can lead to streaks and smudges.
- Applying excessive pressure, which may push water back onto the glass.
- Neglecting to clean the edges of the window, where dirt often accumulates.
The Bottom Line:
Achieving spotless windows requires the right tools and techniques. By mastering your squeegee kit, you can streamline your cleaning process for crystal-clear results. Focus on proper preparation, use the right tools like scrubbers and extension poles and avoid common mistakes like using a dirty blade or applying too much pressure. With attention to detail, maintaining streak-free windows becomes an efficient and satisfying task.
Additional Resources
Last Updated August 14, 2024